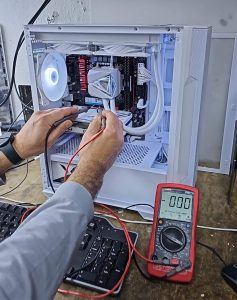
How to Close Laptop and Use Monitor on Windows 11

05 May, 2023

Facebook
Twitter
LinkedIn
Email
Pinterest
WhatsApp

Every version of Windows comes with new features and improvements that make it better than the previous ones. Windows 11 (the latest version) allows folks to not only take advantage of the smooth interface and convenient keyboard shortcuts but enhances the overall computing experience of a user.

One of the best features is the ability to use an external monitor with your laptop. However, sometimes you’d want to close the lid of your notebook to save battery, but doing so may put it to sleep or let it hibernate.

That’s why here, we will take you through the simple steps you need to follow to close your laptop and use your monitor with Windows 11 simultaneously without getting any disruptions in your work.

  1. Connect Your External Monitor to Your Laptop

The first step is to connect your external monitor to your laptop. To do this, you will need an HDMI or VGA cable, depending on the type of monitor you have. Connecting one end of the cable to your laptop’s HDMI or VGA port and the other end to your monitor’s corresponding port will allow the connection to be established. Next, you may turn on your monitor.

  1. Configure Your Display Settings

By default, Windows 11 will duplicate your laptop’s screen on the external monitor. However, if you want to use only the external monitor, the display settings would need to be configured. There are many ways to access the settings for adjusting the display setup.

The quickest ways include using the Windows + P key shortcut, the Function key with “two displays” image (in my Lenovo ideapad 3 it’s the F10 key) or right-clicking on the desktop screen and choosing the “Display settings” would immediately open the settings and allow you to choose what you want to do with the monitor.

Nevertheless, to make the second monitor (the external display) your point of focus, you may choose the “Second Screen only” option from the drop down list as you open the settings via the shortcut.

3. Close Your Laptop

Once you have configured your display settings, you can close your laptop and continue using your external monitor. Windows 11 will automatically detect that you have another monitor connected, and all your content will now appear on that other screen. However, if the laptop ends up sleeping or hibernating which disrupts the casting process on the monitor, then you may change the power settings to stop it. Here’s how:

  • Open the “Control Panel” via the search bar.
  • Choose “Hardware and Sound” and select “Power Options”
  • As you click on the power options, you’ll see a list on the sidebar.
  • You may select “Choose what closing the lid does” from the sidebar.
  • Choose “Do nothing” against the “When I close the lid option” both times under “On battery” and “Plugged in.”

Here’s a picture tutorial to help you better:

4. Revert Back to Laptop Display

If you want to revert back to using your laptop display, you can do so by opening your laptop and following these steps:

  • Press the Windows key + P on your keyboard.
  • Select “PC screen only” from the menu.
  • Your laptop display will now be the only active screen.


Conclusion

Using an external monitor with Windows 11 is an easy and convenient way to enjoy working on a bigger screen. It’s a very helpful feature that enables you to use all your resources on another screen without going through the hassle of data transfer. You can directly channel everything from the laptop to the secondary display.

So, by following the simple steps outlined above, you can quickly close your laptop and use your secondary monitor without any problems.

Call Now Button