
From Processor Failure to RAM Slot Repair: How We Fixed a Dell XPS 9570 in Islington
From Processor Failure to RAM Slot Repair: How We Fixed a Dell XPS 9570 in Islington 16 Dec, 2025 Facebook Twitter Youtube Instagram At Geeks
@geekscallout
19 April, 2023
The sleep settings can be very useful in the matters of saving energy and reducing carbon emissions. And while some people find this feature very convenient, some folks just don’t like it. They may have their reasons like wanting to run the computer for extended periods of time without interruption. That’s why Windows gives you the option of never putting your computer to sleep. So, here, we’ll explain how you can avail that option and stop your computer from sleeping.
Let’s get to it!
The method is pretty straightforward. You go to the settings via the Start and choose, “Power and battery” in the system tab. Then you may scroll the screen to find the “Screen and sleep” option beneath the “Power” heading. Once you click on it, the four options will open up.
The two of them would be about the “On battery” sleep behaviour and the other two would be about the sleep behaviour you want when the laptop is plugged in. With that said, you can change the sleep settings of all the four of them to “Never.” This way your computer will never sleep whether it’s on battery or plugged in.
The screen and device will remain awake until you manually put them to sleep via the Power options in the Start.
You may go to the Screensaver settings via Lock Screen in the Personalisation tab available in your settings. You may select the “None” beneath the “Screensaver” heading and uncheck the box against the, “On resume, display logon screen.” Then you may click on “OK.”
To change the sleep settings on your Windows 7 computer, follow these steps:
By following these steps, you can customise your computer’s power settings to ensure that it does not enter sleep or hibernate mode automatically in your Windows 7.
Your sleep settings can prove to be quite annoying sometimes and depending on the nature of your work, you may want to get rid of it. So, follow the steps above and your computer will never go to sleep again, not until you put it to sleep yourself.
Windows 10 users may have a different interface; however, they can follow the same steps i.e. go to the “Power and Sleep” options via the System in the Settings and selecting “Never” for both options under the “Screen” and “Sleep” headings.
Hopefully, now you know how to adjust the sleep settings on your Windows 11, Windows 10 and Windows 7 computer without a worry.

From Processor Failure to RAM Slot Repair: How We Fixed a Dell XPS 9570 in Islington 16 Dec, 2025 Facebook Twitter Youtube Instagram At Geeks

High-End Custom Gaming PC Build in Chelsea, London, Built by Geeks Callout 15/12/2025 Facebook Twitter Youtube Instagram At Geeks Callout London, we recently completed a

Are PCIe 5.0 SSDs Worth It for Gamers in London? A Practical Guide Dec , 2025 Facebook Twitter Youtube Instagram If you’re into PC gaming here in

Windows 11 December Update Fixes Taskbar Crashes , But Comes with a Few Hiccups Dec, 2025 Facebook Twitter Youtube Instagram If you’ve been banging your

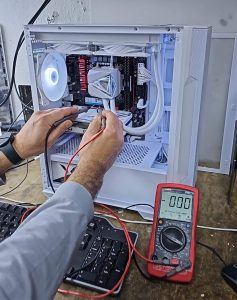
Case Study: Full Gaming PC Repair & Cooling System Replacement – Camden / Kentish Town Updated: 9 Dec , 2025 Facebook Twitter Youtube Instagram At

Microsoft Surface Laptop 4 (Model 1979) Screen Repair Near Islington – London 25 Nov, 2025 Facebook Twitter Youtube Instagram At Geeks Callout, we receive hundreds

